Wednesday, December 12, 2012

White Trash Holiday Cluster F*cks

A user-friendly holiday treat, sure to be a hit at a trailer park near you!


Anyone whose done any kind of baking or helped a friend or family member in the kitchen around the holidays, knows that it can be a daunting task – precise measurements, complicated procedures and numerous steps before the tasty treats can be enjoyed. Well, fear not my friends, this recipe couldn’t be simpler and goes amazingly well with a beer!

  • Prep Time: 5 minutes
  • Cook Time: 5-7 minutes
  • Inactive Time: 2 hours
  • Yield: 10-12 Servings


Ingredients:
  • 20 ounces White Chocolate Chips*
  • 4 Cups Party Mix**
  • 1 Tablespoon Orange Zest (from one medium-sized Orange)
  • 1/4 Teaspoon Cayenne Pepper (optional)
*Milk Chocolate or Darker Chocolate can be substituted, but then you can’t call it White Trash! 
**Chex Mix, Chopped Nuts, Crackers and Crunchy Breakfast Cereals can be substituted and/or combined with the Party Mix.

Directions:

Create a double boiler with a large pot and a heat-proof glass bowl that fits comfortably on top of the pot. Fill the pot with just enough water so as not to touch the bowl. Bring to a simmering boil, using only the steam from the water to heat the bowl. In a large mixing bowl combine the chocolate, cayenne (optional: see chef’s note below) and orange zest (most box cheese graters have a zest panel). 

photo: Kevin Schlanser
Pour the chocolate mixture into your double boiler bowl (alternatively you can microwave this, being sure to stop and frequently sir the mixture so it melts evenly) and gently stir as it begins to melt. Meanwhile, pour your Party Mix into a large ziplock bag and gently crush to break up the big pieces. 

Once the chocolate has melted, using hot pads, carefully place the bowl onto a heat-proof surface (such as another hot pad). Then add the party mix, in thirds, stirring to combine as you go. Don’t worry about breaking up the party mix, it’ll make for better results. Once thoroughly combined, pour the whole kit-n-kaboodle onto a parchment paper-lined baking sheet and form into a single rectangular layer. Allow to cool for about 2 hours until the chocolate has set, then break into bite-sized clusters. 

If you’re feeling especially white trash, put 4 or 5 clusters into a zip lock bag and duct tape to a cheap beer and give as a gift!

Chef’s Note: Be sure not to add any more than a 1/4 teaspoon of cayenne or you’ll be on fire! This adds just the right amount of “kick” to the recipe without being overpowering. Probably a good idea to omit if making for kids or for those that are spice wimps.

Thursday, October 11, 2012

Drunken Braised Short Rib Tacos

In honor of National Taco and National Vodka Days, which happened simultaneously, I decided to create a hybrid concoction to celebrate both.


  • Prep Time: 20 minutes
  • Cook Time:  3 hours
  • Yield: 6 servings

Ingredients:
  • 4-5 pounds beef short ribs (with bone)
  • 1 cup Chianti Wine
  • 1/2 cup Vodka
  • 1 large onion, diced
  • 3 cloves garlic, diced
  • 1 28 ounce can crushed tomatoes
  • 1 cup low-sodium (or scratch) beef stock
  • 1/4 cup chopped fresh cilantro
  • 6 medium-sized flour tortillas
  • 2 cups roughly shredded Radicchio
  • 1/2 cup Red Wine Vinegar
  • Olive Oil
  • 1 teaspoon Sugar
  • Kosher Salt and Cracked Black Pepper
  • Shredded romaine or green leaf lettuce
  • Crumbled Queso Fresco or Feta Cheese

Preheat Oven to 350

Drizzle a generous portion of olive oil in a large dutch oven over medium heat. Season the ribs with salt and pepper on all sides. In batches, so you don’t over crowd the pan, add the ribs and brown on all sides. Set aside. Add the onions and garlic and sauté, stirring often for about 2-3 minutes. Add the tomatoes, wine and vodka. Bring to a boil and be sure to scrape up all the browned goodness on the bottom of the pan. Return the ribs to the party and add the beef stock (chicken stock can be substituted in a pinch) cover and put in the oven for 2 1/2 hours until the meat is fall-off-the-bone ready.

While the ribs are doing their thing, add the red wine vinegar, sugar and a healthy pinch of salt  to a medium non-reactive bowl and stir to dissolve. Add the radicchio (also known as red cabbage), toss to coat, cover and refrigerate for at least 30 minutes. Take out about 30 minutes before you’re ready to serve so it’s not ice cold on your fabulous tacos.

When the ribs are ready, remove them from the cooking liquid and set aside. Grab a large spoon and skim off any excess fat from the liquid. Bring the liquid to a simmer to reduce to a sauce consistency, if needed. Otherwise, keep the sauce warm over low heat. Using two forks, shred the rib meat into small bite-sized pieces. Return the shredded meat into the sauce and stir to combine. Check for seasoning and add salt / pepper to taste, if needed.

To serve, carefully heat the flour tortillas directly over a gas burner on low heat (or wrap in a damp paper towel and microwave for 45 seconds to minute). Lay a tortilla flat on a plate add the lettuce, then the braised shredded beef, crumbled cheese and top with the radicchio. Make sure the lettuce is first so the beef doesn’t soften the tortilla too much.


Thursday, June 21, 2012

SPARKLING MOJITO


A healthy splash of your favorite beer gives this cocktail and refreshing twist. Before you say, WTF? Give it a whirl!

  • Prep Time: 5 mins
  • Makes 2 Cocktails


Ingredients

  • 4 oz Vodka or White Rum
  • A sprig of fresh mint, plus more for garnish
  • 3-4 Basil leaves
  • 1/2 Lime cut into wedges, plus additional for garnish and rimming the glass
  • Tablespoon of Simple Syrup (equal parts water and sugar heated until the sugar dissolves)
  • Beer (lighter beers work better)
  • Coarse Sugar, such as Raw Sugar


Directions

In a cocktail shaker, mull (smash) the mint, basil and lime. Pour in the simple syrup and vodka, then fill the rest with ice and shake well. Grab a cocktail glass, rim it with lime juice, then dip into sugar coating the rim. Fill it with ice, then then a splash of beer and then fill it with your mulled cocktail. Garnish with a wedge of lime and small sprig of mint. Umbrella optional!

Saturday, May 19, 2012

Oven-Roasted Potato & Apple Salad

Savory and sweet come together for this summertime fave!

  • Prep Time: 15 mins
  • Cook Time: 60 mins
  • Yield: 4-6 Servings

Ingredients
  • 1 pound Yukon Gold Potatoes
  • 1 pound Red Potatoes
  • 2 large apples (Jazz, Fiji or similar)
  • 2 large eggs
  • 3-4 sliced green onions, save some for garnish
  • 2 cups plain Greek Yogurt
  • 1/4 cup Dijon mustard
  • 2 tablespoons chopped Italian parsley
  • 1/2 bunch fresh dill, chopped
  • 1/2 lemon, juiced
  • 1/4 cup Extra Virgin Olive Oil, divided, plus more for a drizzle
  • Pinch or two of Red Pepper flakes, optional
  • Kosher (or Sea) Salt and Pepper, to taste
  • Ice Water

Directions
Preheat oven to 375

Chop the potatoes into bite size pieces and place on a parchment paper-lined baking sheet. Drizzle half of the olive oil over them, then salt & pepper. Using your hands, rub the oil and salt and pepper all over the potatoes, then spread them out in 
a single layer. Put into the oven for 35-45 minutes until tender and golden brown.

Lay the eggs into a pot and fill with cold water so there’s about an inch over them. Place over high heat and bring to a boil, remove from the heat, cover and let sit for 17 minutes (yes 17, don’t argue with me, this is Julia Child’s method), then with a slotted spoon, carefully remove the eggs and place into a bowl of ice water for 2 minutes while bringing the cooking water back to a boil. Transfer the eggs back to the boiling water for a quick 10 seconds, then back into the ice water to cool. Once cooled, peel and chop them, place into a large mixing bowl, cover and set aside (If done right, you’ll see there isn’t that ugly grey membrane around the yoke, instead it’ll be a bright orange-yellow).

Once the potatoes are done, remove from the oven and allow to cool. You’ll probably want to eat the potatoes right now since they smell good, but only one bite to make sure they’re okay for the guests!

Into the bowl, where the eggs have been hanging out, goes the green onions (holding back a tablespoon’s worth or so for garnish), yogurt, mustard, dill, pepper flakes, if using (it just adds a little kick, it won’t burn your mouth, I promise), parsley, the rest of the olive oil, salt and pepper and combine. When the potatoes are cooled, providing you haven’t eaten them all, add them to the mix. 

Core and chop the apples into bite-sized pieces and place into a small bowl with the lemon juice. Throughly coat the apple bits with the juice, then pour the whole thing, including the juice, into the large bowl and gently mix together. 

To serve, drizzle with olive oil and garnish with the remaining green onions.

Note: If making this ahead, wait until just before you are ready to serve to prepare and add the apples, so they don’t turn a yucky brown.

Tuesday, May 15, 2012

Thirst-Quenching Sparkling Iced Tea

Satisfy your soda cravings with this bubbly and refreshing take on iced tea.


As a kid, the rule was I couldn’t have a “coke” until after 12 noon. Which goes to show that even back before all of the scientific evidence suggesting soda wasn’t all that good for us, my mom knew it was something that shouldn’t be abused. Of course that didn’t mean as a teen and adult I didn’t have my fill of the carbonated beverages. 

But in my infinite wisdom, I’ve tossed out the can of preservatives, salt, chemicals, artificial color (don’t get me started on “fake” sugars) for a healthier alternative. And the recipe couldn’t be simpler. 


Start with your favorite brewed tea. Personally, I like sun tea, but any means of brewing will work. And here’s the secret: You’ll brew it double strength. No, not to keep you up to study for a final, but because you’ll be diluting it with sparkling water and a little sweetener, courtesy of a splash of fresh juice. If you’re caffeine sensitive, try to avoid chemically decaffeinated varieties, instead opt for a naturally stimulant-free herbal choice.

You’ll get the look and feel of a soda, a little pick-me-up if you so desire, minus all of the not-from-this-earth ingredients, and me thinks you’ll never go back to soda again!


Here's the Recipe:

  • Prep Time: 5 minutes
  • Cook Time: Up to One Hour (depending on brewing method)
  • Yield: 4-5 glasses

Ingredients

  • 1/2 Gallon Brewed Unsweetened Tea (double the amount of tea, but not the water)
  • 1/2 Gallon Sparkling Water (unflavored is best)
  • 1/3 cup Fresh Juice (unsweetened is best), or more to taste
  • Ice Cubes
  • Fresh Mint and/or Lemon for garnish, optional

Directions


Star by brewing your tea, using twice the amount of tea as recommended. Once done, remove the tea bags and allow to cool to room temperature. In a one gallon pitcher or container, fill it half way with ice. Next, pour in your juice. Any juice will work, or even lemonade. But I try to keep it fresh without any added sugar. You can use more juice if you really like it sweet, but I prefer just a hint of sweet. Up to you. Then slowly pour in your sparkling water, followed by your tea. Give it a couple of stirs to combine and you’re ready to go. 

Fill a large glass half way with ice, pour in your sparkling tea, garnish with a sprig of mint, or maybe a slice of lemon and enjoy!


Note: If making it for just yourself or to keep it carbonated longer, combine only the juice and tea and keep the sparkling water sealed tight. When you’re thirsty, add ice to your glass, fill it half full of sparkling water and the rest with your tea and juice combo. Re-seal the sparkling water and you’ll have bubbly tea as you want for a few days in the fridge.

Monday, April 16, 2012

White Trash Hash

You don’t have to live in a trailer park to enjoy this easy-to-make meat & potatoes grub, prepared with a can of beer!


We've all heard of and probably had, corned beef hash, especially that kind from a can. White Trash or not, that's just gross. And to make it from scratch properly, with brisket, takes a great deal of time. So forget about the corned beef, we'll use ground beef (or turkey if you want to look good in your swim suit or halter top), potatoes and of course a can (or two) of beer.

Here's the recipe:

  • Prep Time: 10 mins
  • Cook Time: 20 mins
  • Yield: 3-4 Bowls

Ingredients
  • 1lb Ground Beef (or Turkey)
  • 4-5 Large Red, White or Gold Potatoes, roughly chopped (substitute 2-3 Idaho Russet)
  • 2-3 Garlic Cloves, finely chopped
  • 1/2 Medium Onion, finely chopped
  • 1/2 Bell Pepper, finely chopped
  • 2 Cheap Beers, 1 for cooking and 1 for the chef
  • Salt & Pepper to taste

Directions

Place your potatoes into a medium pot, fill with enough cold water to just cover them, add a teaspoon of salt, cover, then onto high heat, until boiling. Meanwhile, chop your garlic, onion, bell peppers and set aside. 

Once the potatoes have begun to boil, reduce the heat to a simmering boil, but not too rapid or the potatoes will become mush. Cook for about 10 minutes, until tender. While the potatoes are doing their thing, put your meat into a large skillet over medium high heat and brown. Season with salt and pepper, to taste. Once the meat has gotten just browned, use a slotted spoon and remove it from the pan into a strainer or heat-tolerant colander and allow to drain. However, DO NOT remove the rendered fat from the skillet. Over medium heat, add your onions to the skillet and sauté until translucent, about 6-7 minutes. Add in your bell peppers after about 3 minutes, and finally the garlic for the last minute. Salt and pepper to taste (If your meat is lean, you may need to add a teaspoon or so of oil to sauté your veggies).

Keep an eye on your potatoes. Once tender, carefully pour off the water and cover to keep warm. Add your meat back to the skillet. Over high heat, slowly pour in one beer and deglaze (scrape the bottom of the pan) to loosen up all the browny goodness. Once it comes to a boil, reduce the heat to medium and simmer uncovered until it reduces to a thick consistency, about 5-6 minutes.

To serve, place your meat into a medium serving bowl and your potatoes into another. Each person serves themselves, placing potatoes into their bowl, then the meat. 

Top with ketchup, mustard, hot sauce (optional), grated cheese (or canned cheese if you’re REALLY trashy!), schmush together and enjoy!

Thursday, April 5, 2012

Semi-Healthy Peanut Butter Cookies

A tasty update to the traditional cookie, that happens to be gluten-free and vegan.


Your typical peanut butter cookie recipe calls for a whole bunch of flour, sugar and eggs,  which really weighs down the cookie, and certainly isn’t all that healthy. With this contemporary spin, using puréed banana instead of eggs and no flour, the true taste of the peanut butter shines through and go figure, it’s actually a lot healthier too.

Prep Time: 5 minutes
Cooking Time: 10 minutes
Servings: 2 Dozen Cookies


Ingredients:

  • 1 1/4 cups All Natural Peanut Butter, crunchy and/or creamy, without added sugar, room temperature
  • 1/2 ripe large Banana, room temperature 
  • 3 tablespoons Honey
  • 1/2 cup raw or granulated Sugar
  • 1 teaspoon Baking Soda
  • 1/2 teaspoon Vanilla Extract
  • Optional embellishments:
  • Jelly or Jam
  • Chopped nuts: such as pecans, almonds, peanuts 
  • Nutella*
  • Chocolate Chips or Kisses*
*Nutella and chocolate contain milk, which negates the vegan


Directions:
Pre-heat oven to 325.
While still in its container, place the honey into a small bowl of hot water to soften it. Put your peeled banana into a blender or food processor and purée until smooth; OR toss into a large mixing bowl and with a potato masher, schmush it up. Add into the mixing bowl the peanut butter, baking soda, vanilla, honey and sugar. Using a hand mixer on low or a large spoon, thoroughly stir to combine. 
If using chocolate chips or nuts, gently stir them in. Using a spoon, scoop out some cookie dough, then roll it into a ping-pong-sized ball and place onto a cookie sheet, preferably lined with parchment paper. If the dough is a little sticky, dip your fingers into some room temperature water before rolling into balls. Repeat for the rest of the cookies, placing them about an inch apart. 
For old-school cookies, using a fork dipped in water, make crosshatch marks across the top and flatten them out slightly. 
For thumbprint cookies, dip your thumb (or a finger) into some water, push down into the middle of the cookie, then fill with a 1/4 teaspoon of jelly, jam, Nutella or a chocolate kiss.
Into the oven they go for 10-12 minutes. Keep an eye on them so they don’t burn. Once they’re done, place onto a rack to cool for a for about 10 minutes.

Note: The cookies will be soft when they first come out of the oven, be sure not to disturb them until cool. 

As an added treat, place a scoop of softened vanilla ice cream or frozen yogurt in between two cooled cookies and freeze for a couple of hours for a tasty ice cream sammich!

Monday, March 19, 2012

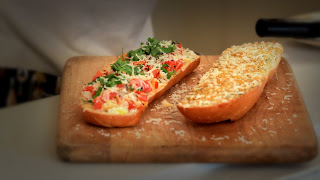
Bangin' Cheesy No B.S. Garlic Bread


In a perfect world, we’d all enjoy fresh ingredients year round. Unfortunately, they’re not always readily available (or in season), often too expensive, and let’s face it, not everyone is comfortable chopping veggies and herbs. 


So I’ve designed my recipe to be easily made with or without fresh herbs. Either way you do it, it’s pretty bangin’! 

Prep Time: 8 mins (if you using fresh ingredients, 3 mins if not)
Cook TIme: 10 mins
Yield: One Split Loaf

If substituting dried herbs, take into consideration a ratio of 3 fresh to 1 dried.

Ingredients:
  • 1 Loaf French Bread
  • 1/2 cup Jack Cheese, shredded
  • 1/2 cup Cheddar Cheese, shredded
  • 1/4 cup Mayonnaise
  • 3 tablespoons Butter, room temperature
  • 6 cloves Garlic, finely chopped OR 2 tablespoons granulated Garlic
  • 1/2 cup Onion, finely chopped OR 1 tablespoon Onion powder
  • 1 sprig Rosemary, finely chopped OR 1 teaspoon dried Rosemary
  • 1 sprig Thyme, finely chopped OR 1 teaspoon dried Thyme
  • 1 Roma tomato 
  • Salt & Pepper, to taste
  • 1/4 cup Extra Virgin Olive Oil
  • 1/4 cup Basil, chiffonade, OR 1 teaspoon dried Basil, for garnish

Directions:
Preheat Oven to 350
Slice the bread in half lengthwise and spread both sides with equal amounts of butter and mayonnaise. Add the garlic and spread it with a knife to blend with the butter and mayo. Next, add the onion, then tomato, then sprinkle the rosemary, thyme and salt & pepper. Top with equal amounts of cheese and a drizzle of olive oil.

Loosely tent each half loaf with foil, being careful not to touch the cheese, or it will get pulled off when you open the foil.

Place side by side on a baking sheet and back for 5 minutes. Remove from the oven, carefully opening the foil and fold underneath the bread and bake for another 5 minutes.

To serve, garnish with basil and slice diagonally for a nice presentation.

Tuesday, March 6, 2012

Peanut Butter Quesadillas


Most of us grew up eating Mom’s PB&J sandwiches. They were a staple in my home, that’s for sure. But after a while, they fall into the “same ole, same ole” category, and that’s why I decided to put my own twist on it.

What makes these fun is you use jelly, jams, preserves, whatever you like, as dipping sauces, something for everyone. Plus, I like to include potato chips and pickles as well. Who didn’t put pickles or chips in their peanut butter sandwich at school, right? 

I guarantee after you try these, you’ll make a batch and take it to your next party! 

Recipe
  • Prep Time: 10 mins
  • Cook Time: 5 mins
  • Yield: 16 Triangle Wedges

Main Ingredients
  • 1 cup Peanut Butter (old fashioned is best without added sugar), divided
  • 4 Burrito-Sized Tortillas 

Optional Sauces and Sides
  • 3, 1/4 cup portions of different Jellies, Jams or Preserves (Strawberry, Grape, Raspberry, whatever you like)
  • Banana Purée (recipe below)
  • Nutella 
  • Handful of regular potato chips
  • Sliced Dill Pickles

Directions
Make sure the peanut butter is at room temperature. It’s much easier to spread and won’t tear your tortillas. Take one tortilla and spread half the peanut butter out to about a half an inch from the edges. Place a second tortilla on top like a sandwich. Repeat with the remaining tortillas. 

Over medium heat, place a dry skillet large enough for your tortilla (this can also be done on the BBQ over low heat, which gives those cool grill marks like in my photo). Once hot, place one of your tortilla quesadillas and cook for a minute or two so it just begins to brown. Keep an eye on it. Using a spatula underneath and your fingers on top, carefully flip it over and continue cooking for another minute or so. The peanut butter should have just begun to melt. Remove from the pan, and set aside to cool. Repeat with the other quesadillas. 

Once cooled, grab a chef’s knife, cut the quesadillas in half, then in half again and finally into triangle wedges. To serve, layer on a platter or large clean cutting board, put your dipping sauces into little bowls and spread the chips and pickles nearby.

And that’s it. Good munchie food. Oh, and my personal fave bite is banana purée and pickles.

Banana Purée Recipe
  • One Large Banana, roughly chopped
  • 1/2 teaspoon Lemon Juice
  • 1 teaspoon Sugar or 1/2 teaspoon Honey

Put everything in a blender or food processor and blend until smooth. Keep covered in the fridge if not using right away to keep the bananas from turning a yuckie grey color.

Sunday, February 26, 2012

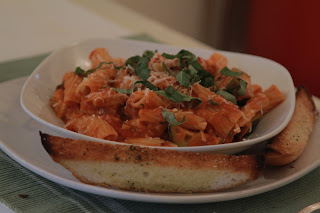
Pasta in due Modi

Pasta Two Ways... One for the Meat-eater. One for the Vegetarian. 


Sean welcomes his first guest, live via satellite, to the Guerrilla Culinarian, Rhode Island native, Adam Carbone.

While Sean prepares rigatoni with chicken in a red sauce, Adam will simultaneously prepare, using the same basic recipe, rigatoni without chicken in a red sauce.

Watch as they both make a simple and tasty dish that starts with basic store-bought spaghetti sauce & pasta and take it up to an eleven!


Version 1: Pasta with Chicken

Prep Time: 10 minutes
Cooking Time: 20 minutes
Yield: 4 servings


Ingredients
  • 1 Jar store-bought regular Pasta Sauce (not embellished, just the basic sauce)
  • 1 Zucchini, cut moon shaped 
  • 3 Garlic Cloves, finely chopped
  • 1 Onion, finely chopped
  • 1 Chicken Breast, cooked
  • 2 Roma Tomatoes, chopped
  • 1 package dehydrated Rigatoni Pasta (or other basic pasta)
  • 1/2 cup Chiffonade of Fresh Basil, divided (cut into ribbons)
  • 3 Sprigs Thyme, chopped, stems removed
  • 1 cup good Red Wine (Cabernet or other hearty wine is best)
  • 1 cup Half & Half 
  • 1/2 cup Olive Oil, divided, plus more for garnish
  • Juice from One Lemon, divided
  • 1/2 cup Parmesan cheese, plus more for garnish
  • Dash Red Pepper flakes, optional
  • Salt & Pepper, to taste


Directions

Prepare half of the pasta “al dente” according to the package instructions. Be sure to generously salt the water beforehand.

In a Dutch oven or large pot, sauté the onion in about half the olive oil for about 5-6 minutes until translucent. Add in the garlic for another minute. Once everything is tender, add in the zucchini for one or two minutes, but make sure it says firm. Finely chop half the fresh basil, then add it to the sauce along with the wine, tomatoes and thyme. Cook until just warm. Next up is the pasta sauce, half & half and one cup of your pasta water. Bring to a moderate simmer, then cover and turn the heat to low. Stirring occasionally, allow to simmer for about 10 minutes, keeping it at a low simmer.

Once you’ve drained the pasta, toss it with a little bit of olive oil, cover and set aside. 

Add the parmesan cheese to the sauce, stir it until it melts, then gently fold in the pasta and stir to combine. Cook for a few more minutes so the pasta can absorb the flavors. Right before serving, stir in the remaining lime juice.

Garnish with a drizzle of olive oil, remaining and red pepper flakes.


Version 2: Pasta with Mushrooms (Vegetarian)


Prep Time: 10 minutes
Cooking Time: 20 minutes
Yield: 4 servings


Ingredients
  • 1 Jar store-bought regular Pasta Sauce (not embellished, just the basic sauce)
  • 1 Zucchini, cut moon shaped 
  • 3 Garlic Cloves, finely chopped
  • 1 Onion, finely chopped
  • 1 cup Mushrooms, roughly chopped
  • 1 14oz Can Crushed Tomatoes
  • 1 package dehydrated Rigatoni Pasta (or other basic pasta)
  • 1 teaspoon Dried Basil
  • 1 teaspoon Dried Thyme
  • 1 teaspoon Dried Parsley
  • 1 cup Half & Half
  • 1/2 cup Olive Oil, divided, plus more for garnish
  • Juice from One Lime, divided
  • 1/2 cup Parmesan cheese, plus more for garnish
  • Dash Red Pepper flakes, optional
  • Salt & Pepper, to taste


Directions

Prepare half of the pasta “al dente” according to the package instructions. Be sure to generously salt the water beforehand.

In a Dutch oven or large pot, sauté the onion in about half the olive oil for about 5-6 minutes until translucent. Add in the mushrooms for another minute or two, then the garlic for another minute. Once everything is tender, add in the zucchini for one or two minutes, but make sure it says firm. Pour in half the lime juice to de-glaze the pan. Then goes the crushed tomatoes, basil, and thyme. Cook until just warm. Next up is the pasta sauce, half & half and one cup of your pasta water. Bring to a moderate simmer, then cover and turn the heat to low. Stirring occasionally, allow to simmer for about 10 minutes, keeping it at a low simmer.

Once you’ve drained the pasta, toss it with a little bit of olive oil, cover and set aside.

Add the parmesan cheese and stir to combine, then gently fold in the pasta and stir to combine the whole kit & kaboodle. Cook for a few more minutes so the pasta can absorb the flavors. Right before serving, stir in the remaining lime juice.

Garnish with a drizzle of olive oil, dried parsley and red pepper flakes.

Tuesday, February 21, 2012

Black & White Chili

Enjoy a beer or two with this flavorful and spicy bowl of comfort, cooled off with some creamy yogurt.


Prep Time: 10 mins
Cook Time: 2 hr 15 mins
Yield: 10-12 Servings

Ingredients:

1/2 cup olive oil
2 red bell peppers, diced (about 2 cups)
2 yellow onions, diced (about 2 cups)
1 head garlic, minced (about 1/4 cup)
2 pounds Carne Asada (flank steak), trimmed and cut into 1/4” cubes
2 teaspoons granulated onion
2 teaspoons granulated garlic
3 tablespoons chili powder
2 teaspoons ground coriander
2 teaspoons cayenne pepper
2 teaspoons paprika
2 teaspoons ground cumin
2 teaspoons kosher salt
2 teaspoons cracked black pepper
1 cup tomato sauce
1 cup crushed tomatoes
1/2 cup chipotle chilis in ancho sauce, puréed (reduce or omit if less "kick" is desired)
2 12 ounce lager beers: 1 for the recipe, 1 for the cook
1 cup chicken stock
2 (15.5-ounce) cans black beans, with juice
2 (15.5-ounce) cans cannellini beans, with juice
1/2 cup fresh cilantro, chopped
Juice from 2 limes
Mini croutons, for garnish*
1 bunch green onions, sliced thin, for garnish
1 cup shredded Cheddar, for garnish
1/2 cup plain Greek yogurt, whipped, for garnish


Directions:

In large stock pot over medium-high heat, add the olive oil. Add bell pepper and onion and cook until tender, about 5 minutes. Add garlic and sauté a minute longer. Add the carne asada and brown. Cook until meat has a nice brown crust and cooked med-rare, about 4 to 7 minutes (the meat will cook more while simmering). Add in granulated onions, granulated garlic, chili powder, paprika, cumin, coriander, cayenne, salt and pepper and cook for 1 minute. Add in tomato sauce, crushed tomatoes and chipotle purée and stir for 2 minutes. Stir in beer and chicken stock. Add beans, lower heat and simmer for 2 hours. A few minutes before serving, add the lime juice and chopped cilantro, stir to combine.

To serve, pour into a soup bowl, top with a drizzle of whipped yogurt, cheddar cheese, green onion and some mini croutons. At this point, you'll probably need another beer.


*Mini croutons, if not available in the store, can be made by chopping regular croutons with a sharp knife, or alternatively making them by chopping a couple slices of sourdough or other good bread into 1/2” squares, drizzling with olive oil and toasting in a toaster oven until golden brown.

Sunday, February 19, 2012

PB&J Oatmeal

A kid-friendly breakfast everyone will enjoy.


Prep Time:  5 mins
Cook Time: 10 mins
Yield: 4 Servings

Ingredients

3 1/2 cups Water
2 cups Rolled Oats (non-instant)
1/8 Stick Unsalted Butter
1/2 cup Raisins or Dried Cranberries
1/2 cup Slivered or Chopped Almonds
1/4 teaspoon Vanilla extract
3 tablespoons Creamy Low-Sodium (or homemade) Peanut Butter
4 teaspoons (room temperature) grape jelly or jam*
4 dashes of Cinnamon, for Garnish

*Substitute a fresh fruit and honey purée for a tasty and healthier alternative to store-bought jelly or jam.

Directions

In a dry small sauté pan, toast the almonds over medium heat until a light golden brown, about 5 minutes. Set aside.

Place a medium sauce pan over medium heat. Once hot, add the butter until it begins to melt. Gently stir in your oats and toast until they just begin to brown, about 4-5 minutes.

Meanwhile, in a tea kettle or small pot, bring the water to a gentle boil. Once the oats are toasted, add in the raisins, then carefully pour in the boiling water. This will become a very rapid boil, so be careful. Reduce the heat to low and simmer, uncovered for about 5 minutes until most of the water is absorbed. Only stir it a few times, as you don’t want to make the oats too mushy.

Place the peanut butter in a microwave safe dish and heat for about 20-30 seconds just to soften it. When the oats are ready, remove from the heat and gently stir in the peanut butter and vanilla.

To serve, pour into a bowl, top with a teaspoon of jelly, some toasted almonds and finish with a dash of cinnamon.

Friday, February 17, 2012

Easy Gourmet-ish Garlic Bread


Who doesn't like garlic bread, right? Especially if you’re from Gilroy, CA, then odds are you REALLY like garlic. 
“Gilroy is well known for its garlic crop and for the annual Gilroy Garlic Festival, featuring various garlicky foods, including garlic ice cream. Gilroy's nickname is "Garlic Capital of the World,"with Gilroy Foods processing more garlic than any other factory in the world; most pickled, minced, and powdered garlic come from Gilroy.”
Sure, there’s probably some guy in Guam or Boise or somewhere that doesn’t like it, but YOU mister garlic-bread-disliker, are in the minority! 

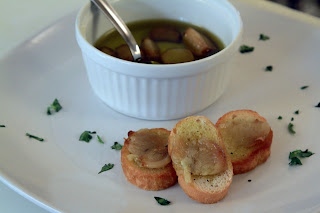
You’re probably asking yourself, what makes it easy? Why is it gourmet-ish? To answer your inquiry minds, my take on garlic bread couldn't be simpler to make. Only three main ingredients: Garlic, bread and olive oil.  And once you taste it, it might just remind you of one of those fancy appetizers you’d get at a nice restaurant. And since you’re roasting the garlic, you’ll find that it really mellows the taste, giving you rich and deep flavor, without the harshness associated with raw garlic. 


Here's the recipe:

Prep Time: 1 minute
Cook Time: 42 minutes
Yield: 10-15 slices


Ingredients:
1 Head Garlic
1/2 Loaf Baguette, sliced into rounds*
1/4 Cup Olive Oil, plus 2 Tablespoons
Kosher Salt & Pepper to taste


*Most grocery store bakeries will be happy to slice your baguette into rounds for no additional charge.


Directions:

Pre-heat over to 425.

Holding the garlic head sideways, slice through the very tops of the garlic cloves.  Place the garlic head cut side up in the middle of a piece of 10"x10" foil. Drizzle a tablespoon of olive oil over the garlic, then sprinkle with a little salt and pepper. Fold the sides of the foil into a little tent, twist the top and place into the oven for 30-35 minutes, until the garlic is a tender and golden brown.


Remove it from the oven and allow it to cool for a bit. While it's cooling, place your bread rounds flat on a baking or cookie sheet. Lightly drizzle some olive oil over the slices, then give them a sprinkle of salt and pepper. Set aside.

Once the garlic is cool enough to handle, gently remove the cloves from their paper peel and place into a sauce pan. Pour about a 1/4 cup of olive oil over the garlic, about 1/8 inch covering the bottom of your pan. Put the pan over very low heat. All you want to do is warm the olive oil and allow the garlic flavor to infuse. Only takes a few minutes.

Place your bread into the same 425 oven for about 5 minutes. You’re just going to warm the bread and give a light crunch. Be careful not over bake it.

Carefully pour your olive oil and garlic into an oven-safe ramekin or other bowl that can handle hot oil. Once your bread comes out of the oven, place it into a linen-lined basket or something to keep it warm.

To serve, grab a bread round and top it with a garlic clove and a little infused olive oil. Using the back of a spoon, gently smash the garlic clove. It should spread like butter. And there you have it, Easy Gourmet-ish Garlic Bread!

Once you've mastered the Easy Gourmet-ish Garlic Bread
, try some of these simple toppings that’ll step it up even more. Start with some chopped tomatoes and finely chopped shallots (or red onion) soaked in balsamic vinegar. Or maybe some grated parmesan cheese and minced herbs, such as basil, parsley, thyme, rosemary. Or all of the above. Whatever suites your taste buds. 


Friday, February 10, 2012

Cooking for One: Salmon Two Ways

When cooking for just yourself it's sometimes difficult to be cost effective with what you buy and make. Ultimately a lot goes to waste if you don't finish what you made, especially if you get tired of repeating the same meal. So I try to make things that can be re-purposed into something else to give myself a little variety.

Day 1: Foil-Wrapped Baked Salmon with Brown Rice Pilaf

I started with just under a pound of wild-caught Sockeye Salmon Fillet. I cut it into two fillets, coated it with olive oil, salt and pepper and set it aside. I chopped up a couple of Roma tomatoes, finely chopped half a brown onion, chopped a couple of sprigs of fresh thyme, tossed in some dried oregano, fresh lime juice, salt & pepper and mixed it all together.

Meanwhile, I browned some broken pieces of angel hair pasta in some butter, added some chopped onion, red bell pepper and garlic and sweated them until tender. I added a cup of long grain brown rice, 2 cups of fresh chicken stock and let it simmer for about 45 minutes.

Next, I placed each salmon fillet into a piece of foil, topped it with the tomato salsa, wrapped it up and into the 400 degree oven for about 35 minutes.

I topped a serving of the brown rice pilaf with a salmon fillet. So amazingly tender, with a buttery texture. So good.

I carefully placed the other fillet into a plastic container and after it cooled to room temp, I put in the fridge for next day's dinner.

Day 2: Baked Salmon Tacos with Orange-Tomato Salsa


First thing, I zested about half an orange and a lime and set it aside. Next, I peeled and segmented a couple of navel oranges (it's important to remove all of the bitter pith), chopped a medium tomato, minced a clove of garlic, finely chopped some cilantro, and juiced two limes. I poured in a tablespoon's worth of both olive oil and plain yogurt, salt and pepper mixed it all together and tossed it into the fridge for about an hour.

While the salsa was chilling, I took out last night's salmon fillet to come to room temp, before preparing it. I discarded the salsa it was baked with and set it aside. Once it was ready, I steamed it to re-heat it, then chopped it into bite-sized pieces.

When the salsa coms out of the fridge, I sprinkle in the orange and lime zest I made earlier, and gave it a gentle stir. Then I grab a warmed flat bread round fill it with a layer of chiffonade of spinach, the salmon and top it with the orange-tomato salsa. On the side was some seasoned avocado and another serving of the brown rice pilaf. This one called for a Sangria!


This was a very inexpensive, tasty and healthy couple of meals with no waste. That's what I'm talking about!


Save the Asparagus!


Whoopsey, you boiled your asparagus for too long! What to do? Well, don't throw it out, watch as Sean transforms this kitchen mishap into a tasty Cream of Asparagus soup with common ingredients found in your kitchen. 


Prep Time: 10 minutes
Cook Time: 30 minutes
Yield: 4-5 bowls of soup

This recipe is based upon almost over-cooked boiled asparagus, designed to save the day!


Ingredients:

1 bunch Asparagus
1/2 Medium Red Onion, roughly chopped
2 Cloves Garlic, roughly chopped
2 Bay Leaves
1 Tablespoon Fresh Rosemary*
1 Tablespoon Fresh Thyme*
1/2 Teaspoon Red Pepper Flakes (optional)
1 1/2 Cups Chicken Stock (substitute low-sodium chicken broth or vegetable stock)
1 Cup Half & Half (Use heavy cream for a richer soup; low or non-fat plain yogurt for a healthy substitute)
1/4 Cup Olive Oil, plus 1 tablespoon for garnish
1/4 Stick Unsalted Butter
Kosher Salt and Cracked Black Pepper
Pinch Paprika, for garnish
Pinch Dried Parsley, for garnish
3 Cups Ice Water

*You can substitute dried herbs, just use 50% as much

Special Equipment: Blender or Food Processor

Directions:

Assuming the asparagus has had the woody ends removed and has been boiled in a large pot or dutch oven with approximately 4 cups of water... Turn off the heat and with a pair of tongs, carefully remove the stems from the water (DO NOT discard the cooking water) and place them into a large bowl with the ice water. This will stop the asparagus from cooking any further.

Discard all but about 2 cups of the cooking water and return to medium heat. Add the chicken stock and bay leaves and bring it to a gentle simmer.

Place a saucepan over medium heat and once hot, add the olive oil and butter. Once the butter has begun to melt, add the chopped onion, garlic, rosemary, thyme, pepper flakes (if using) and salt and pepper to taste. Sweat for about 6-7 minutes until the onion and garlic are tender.

In the pot with the stock and water, add the half & half and return to a simmer. Once the onions and garlic are ready, add the mixture to the stock and stir to combine. Continue simmering for 5 more minutes.

Remove the asparagus from the ice bath and place in your blender. Carefully pour the stock mixture into the blender, until it's just over half full. DO NOT overfill the blender or you'll have a big mess! If you have a large amount of asparagus you can do this in two batches.

Speaking of messes, once you're ready to purée, be careful not to completely seal the blender lid or you'll end up with a heat explosion. Not only is that a buzz kill, but it can seriously burn you. Best thing is to leave one corner uncovered and use a clean kitchen towel to cover the rest. Set your blender on purée, pulse a few times to get things moving, then purée until smooth. 

Pour the purée back into your pot, return to medium heat and simmer uncovered for about 10 minutes until it thickens. Check for seasoning and add a little salt and pepper to taste, if needed.

While the soup is simmering, pour a teaspoon or so of olive in a small bowl with a pinch of paprika and a pinch of dried parsley, stir to combine.

To serve, pour the soup into bowls and garnish with a drizzle of your olive oil mix.

Congrats, your mushy, yucky boiled asparagus is now a yummy Cream of Asparagus Soup. Oh and your family, friends and/or guests don't need to know you didn't plan this all along. It'll be our little secret!

Thursday, February 9, 2012

All American Ramen

Get more out of your ramen, without more out of your pocket.


We’ve all been on a budget and stocked our cupboards with instant ramen noodles. But they can quickly become boring and unsatisfying. Not to mention, the “flavor packet” contains 800-1000mg of salt (including MSG). That’s almost as much salt as the average adult should have in an entire day. No bueno. 

This easy-to-do recipe uses common things most of us have around the house and really takes simple ramen to the next level. After boiling a hot dog, you’ll use the same water to boil your noodles. Yup, that water is loaded with flavor. Think of eating a juicy hamburger right off the BBQ. That juice is fat. Fat is flavor and your hot dog just flavored your ramen noodles. That, with a simple creamy parmesan sauce, you’ll never go back to old school instant noodles again.

So toss out the flavored salt, grab a hot dog, and let’s make some All American Ramen! 


Here's the Recipe...

Prep Time: 5 mins
Cook Time: 10 mins
Yield: 1-2 servings
------------------------

Ingredients:

1 Hot Dog
1 Package Store-bought Ramen Noodle
1 Tablespoon Parmesan Cheese, shredded 
(or 2-3 packets, such as delivered with pizza)
1/8 Stick Butter (1 Tablespoon)
1 Tablespoon Olive Oil (double the butter if you don't have Olive Oil)
1 teaspoon dried Parsley, divided
A pinch or two Red Pepper Flakes (optional)
1/2 Teaspoon Black Pepper
2 Cups Water

Directions:

In a medium sauce pan, add the water and the hot dog and bring to a boil. Once boiling, cook for about 3 minutes or until you see the seam (on most wieners) split. Carefully remove the hot dog to a small plate and set aside. DO NOT turn off the heat or discard the hot dog water, this is now your ramen noodle water. The water should still be boiling and perfect to add your noodles. Boil them for about 2 1/2 to 3 minutes. Then cover your pan and carefully strain out the majority of the water into the sink, by creating a tiny gap with the lid. BE CAREFUL not to put your face directly over the sink or you'll get a smokin' hot facial!

Put the lid back on the pan and return to the stove, making sure the heat is turned off.
Grab your trusty chef's knife (from your Kitchen Arsenal) and cut the hot dog into thick nickel-sized rounds (do your best to keep them all the same size).

Over medium heat, add the olive oil to a sauté pan (also known as a frying pan) and once it begins to thin out, carefully add the chopped hot dog, making sure the pieces lay flat. Sauté for about a minute until they begin to form a nice brown crust, then carefully turn over with tongs or a spatula (use rubber tongs / spatula if your pan is non-stick). Cook for another 30 seconds, then add the butter and half of the red pepper flakes (if using), half the parsley and black pepper. Continue cooking until the butter melts (keep on eye on this so the butter doesn't burn).

Carefully pour your ramen noodles into the sauté pan. Toss in half of the Parmesan and give it a gentle stir until combined.

To serve, pour the mixture onto a plate or large bowl, top with the remaining parmesan, parsley and red pepper. And voila! You've made some rockin' All American Ramen! Bon Appetite!

NOTE: Because most hot dogs and Parmesan cheese contain a good deal of salt, no additional salt was added to this recipe.